Logging Into the 192.168.1.1 Admin Panel
The IP address 192.168.1.1 is a standard private address frequently used to enter a router’s administrative dashboard. If you have managed a home or office network, you likely recognize this address as the default gateway for prominent brands like TP-Link, Huawei, Netgear, Linksys, D-Link, and PLDT. Logging in through 192.168.1.1 allows users to oversee all essential network configurations.
This access enables you to update your Wi-Fi name and password, strengthen security protocols, monitor connected hardware, install firmware updates, and resolve connectivity problems. Mastering the use of 192.168.1.1 provides full authority over your router, ensuring your internet remains high-speed, protected, and consistent.
A Simple Guide to Accessing 192.168.1.1 Router Settings
Entering the 192.168.1.1 admin interface is straightforward provided your device is active on the appropriate network. Use these steps to launch the router dashboard and start adjusting your configurations.
Step 1: Connect Your Device to the Wi-Fi or LAN Port
Link your computer, laptop, or smartphone to the router’s Wi-Fi signal to begin. For a more reliable and consistent link, you may also plug in directly using an Ethernet cable. Keep in mind that the login interface will fail to open if your device is not actively communicating with the router.
Step 2: Open Any Web Browser
Open your favorite web browser, whether it is Chrome, Firefox, Edge, or Safari. Before you begin typing the IP address, ensure the address bar is completely empty.
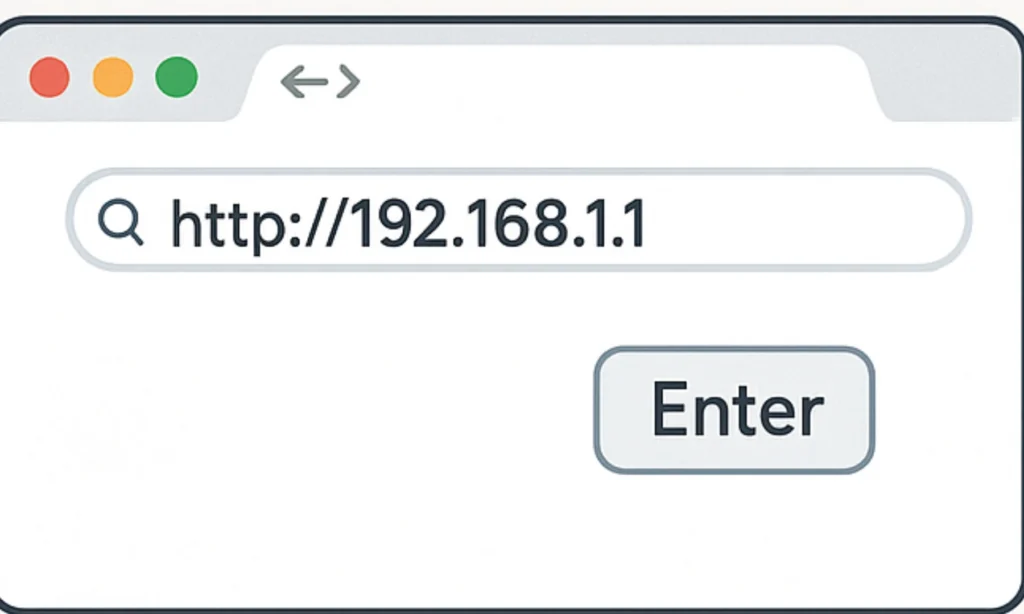
Step 3: Access the Gateway via http://192.168.1.1
Input the IP address directly into your browser’s address bar and hit Enter. If your router is configured to this specific address, the login screen will load immediately.
Should an error message appear instead, your router likely utilizes a different default gateway, such as 192.168.0.1 or 10.0.0.1.
Step 4: Enter the Username and Password
You will be prompted to provide your login credentials. Frequently used default combinations include:
admin / admin
admin / password
admin / 1234
If these standard pairings fail, locate the identification sticker on the back or underside of your router. You can also retrieve the specific login details from the user manual or by contacting your internet service provider.
Step 5: Accessing the Admin Dashboard
A successful login grants you access to the router’s primary dashboard, which acts as the central hub for all network configurations. From this interface, you can modify your Wi-Fi name and security key, refine protection settings, and monitor all currently connected hardware. You also have the ability to establish parental boundaries, create isolated guest access, install the latest firmware, and adjust a wide variety of advanced network parameters.
Relevant IP Adresses:
Visit the 10.0.0.1 Piso WiFi status page to monitor your remaining internet credits.
You can consult our comprehensive router IP database to find alternative login URLs for various manufacturers.
Users of D-Link and TP-Link hardware typically find their administrative settings located at 192.168.0.1.
For high-performance fiber modems, the default gateway is frequently configured as 192.168.100.1.
The Role of 192.168.1.1 in Your Home Network
The IP address 192.168.1.1 functions as a private gateway, directing data traffic throughout your local home or office network. To grasp why this specific address is used and how it operates, it is helpful to understand a few fundamental networking principles.
Understanding the Difference: Private IP vs. Public IP
A private IP is restricted to your local network, whereas a public IP is required for any communication with the broader internet.
Within your home, your router, smartphones, and computers all utilize unique private IP addresses to identify each other. Meanwhile, your Internet Service Provider (ISP) assigns a single public IP to your router, which acts as the official “address” for your entire household when sending or receiving data across the web.
This setup allows dozens of your personal devices to share one internet connection while keeping their individual local traffic organized and secure behind the router.
Understanding DHCP, Network ID, and Device ID
Routers commonly employ the Dynamic Host Configuration Protocol (DHCP) to automatically distribute private IP addresses to every connected device. This system ensures that no two devices on your local network share the same identity, preventing data collisions.
Anatomy of an IP Address
An IP address is structured into two distinct segments that define its function:
Network ID: This identifies the specific local network.
Device ID (Host ID): This identifies the individual piece of hardware (like a phone or laptop) within that network.
In the standard gateway address 192.168.1.1, the network portion is 192.168.1, while the final .1 serves as the unique device ID reserved for the router itself. Subsequent devices joining the network are typically assigned IDs starting from .2 and upward.
NAT (Network Address Translation)
NAT is a router feature that lets multiple devices share a single public IP address. It helps keep the network secure and allows many devices to connect to the internet simultaneously without conflict.
Why 192.168.1.1 Is the Default Gateway
Router manufacturers often choose 192.168.1.1 as the gateway because it is simple, widely compatible, and easy to remember. It serves as the primary access point, where users can log in to the admin panel, manage settings, and control the entire network.
Common Factory Credentials for 192.168.1.1
Most routers using 192.168.1.1 ship with factory-set login credentials for initial access. These details are typically found on a label attached to the hardware.
The following table outlines the most common default credentials for popular brands that utilize this gateway:
Default Login Credentials
Router Brand | Default IP Address | Username | Password |
192.168.1.1 | admin | admin | |
D-Link | 192.168.1.1 | admin | admin |
Netgear | 192.168.1.1 | admin | password |
Linksys | 192.168.1.1 | admin | admin |
Huawei | 192.168.1.1 | admin | admin |
Zyxel | 192.168.1.1 | admin | 1234 |
ASUS | 192.168.1.1 | admin | admin |
192.168.1.1 | admin | admin | |
Belkin | 192.168.1.1 | admin | (blank) |
PLDT | 192.168.1.1 | admin | 1234 or pldtadmin |
Others | 192.168.1.1 | admin | varies by model |
The provided default credentials are designed for the initial setup only. To maintain robust security, you should update your username and password immediately after your first successful login.
If the standard defaults fail to grant access, the accurate login information is typically located on the router’s physical label or within the user manual.
Recovering Access to Your 192.168.1.1 Admin Panel
It is quite common to lose access to your router’s login, but the recovery process is typically straightforward. Follow these steps to regain entry to the 192.168.1.1 administration page.
1. Checking the Physical Router Label
A majority of routers feature a physical sticker on the back or underside that lists the factory-preset login credentials. Search for terms like admin, password, or 1234 on this label. Once located, input these specific details on the 192.168.1.1 login screen to gain access.
2. Search Online for Your Router Model
If the physical sticker is damaged, missing, or unreadable, you can search for the default login credentials specific to your router’s model. For instance, a quick search for “TP-Link default login” or “Huawei router default password” should provide the necessary details, as manufacturers frequently publish this information online.
3. Try the Most Frequent Default Login Credentials
Numerous routers utilize universal login pairs for their initial configuration. You can attempt to gain access by testing these standard default combinations:
admin / admin
admin / password
admin / 1234
5. Create a New Login and Save It
Once you have successfully regained access, your first priority should be to establish a strong, unique username and password to fortify your router’s security. To prevent future lockouts, ensure you record these new credentials in a secure location.
5. Perform a Full Factory Reset
If you have customized your login credentials and can no longer recall them, performing a factory reset is the only method to regain control of your settings.
1. Locate the Reset Button
The reset button is typically a tiny, recessed switch found on the back or bottom panel of the router. It is designed this way to prevent accidental presses.
2. Press and Hold
Using a thin object like a paperclip or pin, press and hold the button for 10 to 15 seconds. Continue holding until the router’s LED lights begin to blink rapidly or the device performs a visible restart.
3. Understand the Reset Impact
Executing a factory reset restores the router to its original “out-of-the-box” state. Warning: This will erase all your custom configurations, including:
Personalized Wi-Fi names (SSIDs) and passwords.
Port forwarding or firewall rules.
Parental controls and guest network settings.
4. Log In Post-Reset
Once the router has fully rebooted, reconnect your device and navigate to http://192.168.1.1 in your browser. You can now log in using the default username and password printed on the router’s physical label or found in the official manual.
How to Find Your Router's IP Address (If 192.168.1.1 Does Not Work)
If the 192.168.1.1 interface fails to load, your router is likely configured with a different default gateway. Various manufacturers utilize alternative private IPs, such as 192.168.0.1, 192.168.10.1, 192.168.15.1, or 10.0.0.1.
You can quickly identify the correct address by checking your specific device settings:
On Windows
To identify your router’s IP address on a Windows computer, follow these steps to access your network configuration details:
Open Control Panel: Press the Windows key, type “Control Panel,” and press Enter.
Navigate to Network Settings: Click on Network and Internet.
Access the Sharing Center: Select Network and Sharing Center.
View Your Connection: Click on the name of your active Wi-Fi or Ethernet connection (usually highlighted in blue).
Open Connection Details: In the status window that appears, click the Details… button.
Identify the Gateway: Look for the entry labeled IPv4 Default Gateway. The numerical value listed there (e.g.,
192.168.1.1or10.0.0.1) is your router’s specific IP address.
On macOS
Open System Settings: Click the Apple menu () in the top-left corner of your screen and select System Settings (or System Preferences on older versions).
Navigate to Network: In the sidebar, click on Network.
Select Your Connection: Click on your active connection, such as Wi-Fi or Ethernet.
View Details: Click the Details… button located next to your connected network.
Identify the Gateway: Select the TCP/IP tab from the left-hand list. Look for the Router field; the numerical address listed there (e.g.,
192.168.1.1) is your gateway address.
On Android
Open Settings: Locate and tap the Settings icon on your home screen.
Go to Wi-Fi: Tap on Wi-Fi (or Network & internet > Internet on some Android devices).
Tap the Connected Network: Find the network you are currently using.
On iOS: Tap the blue “i” icon next to the network name.
On Android: Tap the gear icon next to the network name.
View Advanced Settings: Scroll down until you reach the IP settings or Advanced section.
Identify the Gateway: Look for the field labeled Router (iOS) or Gateway (Android). The numerical address listed there (e.g.,
192.168.1.1) is your router’s IP.
On iPhone or iPad
Open Settings: Tap the Settings app on your home screen.
Tap Wi-Fi: Select the Wi-Fi category to see your current connections.
View Network Details: Tap the blue “i” (information icon) located next to the name of the network you are currently using.
Identify the Gateway: Scroll down to the IPv4 Address section. Look for the field labeled Router; the numerical address listed there (e.g.,
192.168.1.1) is your gateway IP.
Via Command Prompt (Windows)
Open the Run Command: Press the Windows key + R on your keyboard simultaneously.
Launch Command Prompt: In the box that appears, type
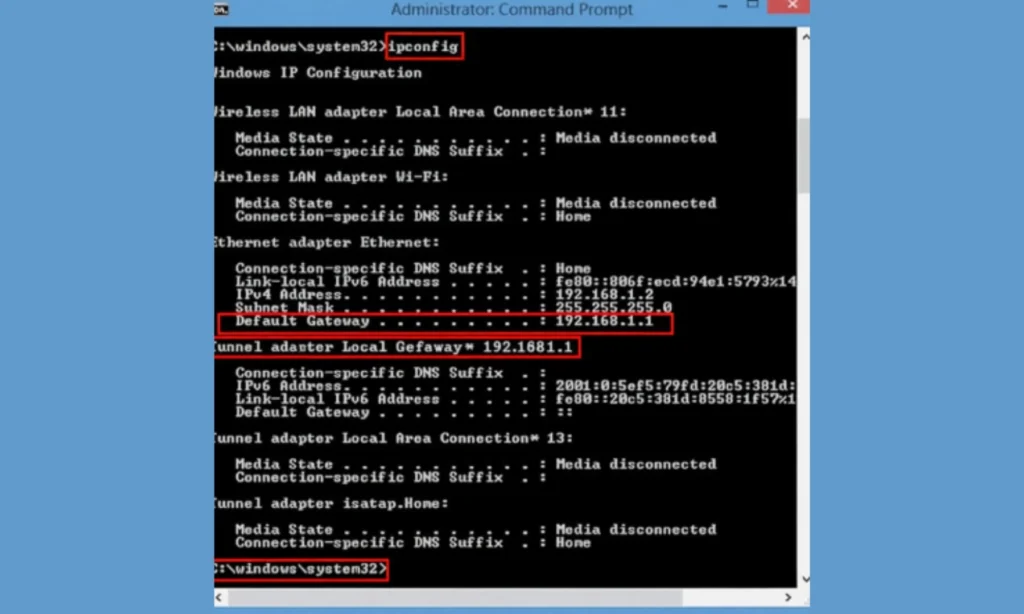
cmdand press Enter.Execute the Command: In the black terminal window, type
ipconfigand press Enter.Identify the Gateway: Scroll through the results to find your active network adapter (usually labeled “Wireless LAN adapter Wi-Fi” or “Ethernet adapter”).
Locate the Address: Look for the line labeled Default Gateway. The numerical address listed there (e.g.,
192.168.1.1) is the IP address you need to enter into your web browser to reach the login page.
Why Router Manufacturers Use Different IP Addresses
Routers from different brands and internet providers may use different private IP ranges. Common alternatives include:
- 192.168.0.1
- 192.168.10.1
- 192.168.15.1
- 192.168.8.1
- 10.0.0.1
If 192.168.1.1 does not work, checking the correct IP using the steps above will help you access your admin panel without confusion.
Avoid These Common IP Address Typos
It is incredibly easy to mistype an IP address, and even a single character error will prevent your router’s login page from loading. Most mistakes occur because certain numbers and letters look nearly identical, or because of common typing habits (like adding “www” or “.com”).
Below is a list of the most common mistyped versions of 192.168.1.1, along with the correct format you should use.
Common Login Errors vs. The Correct IP Format
Mistyped IP Address | Why It Is Incorrect | Correct Version |
192.168.l.l | The letter “l” is used instead of the number “1”. | 192.168.1.1 |
192.168.1.1.1 | Extra numbers are added. IPs cannot have five sections. | 192.168.1.1 |
192.168.1o.1 | The letter “o” is used instead of zero. | 192.168.10.1 or 192.168.1.1, depending on the router |
Local IP addresses do not use “www” or “.com”. | ||
http//192.168.1.1 | Missing the colon after “http”. | |
192.168.1.256 | The number 256 is outside the valid IP range. | 192.168.1.1 |
Why We Mistype 192.168.1.1: Fonts, Layouts, and Habits
Confusing “1” with “l”: This is the most common error. Users often type 192.168.l.l (using the lowercase letter “L”) instead of the number 1.
Confusing “0” with “o”: In addresses like 192.168.0.1, users may accidentally type the letter “o” instead of the number 0.
Adding Extra Digits: Typographical slips like 192.168.1.11 or 192.168.1.1.1 will direct you to a non-existent location.
Treating it Like a Website: Adding a .com, .net, or www. (e.g., www.192.168.1.1.com) will trigger a Google search instead of opening the router’s internal page.
Missing the Dots: Forgetting the periods (e.g., 19216811) makes the address unreadable to your browser.
Reconfiguring Your Local Network IP for TP-Link, Netgear, and D-Link
Changing your router’s default IP address is an excellent way to personalize your network and prevent “IP address conflicts”—which occur when two devices (like two routers on the same network) try to use the same identity.
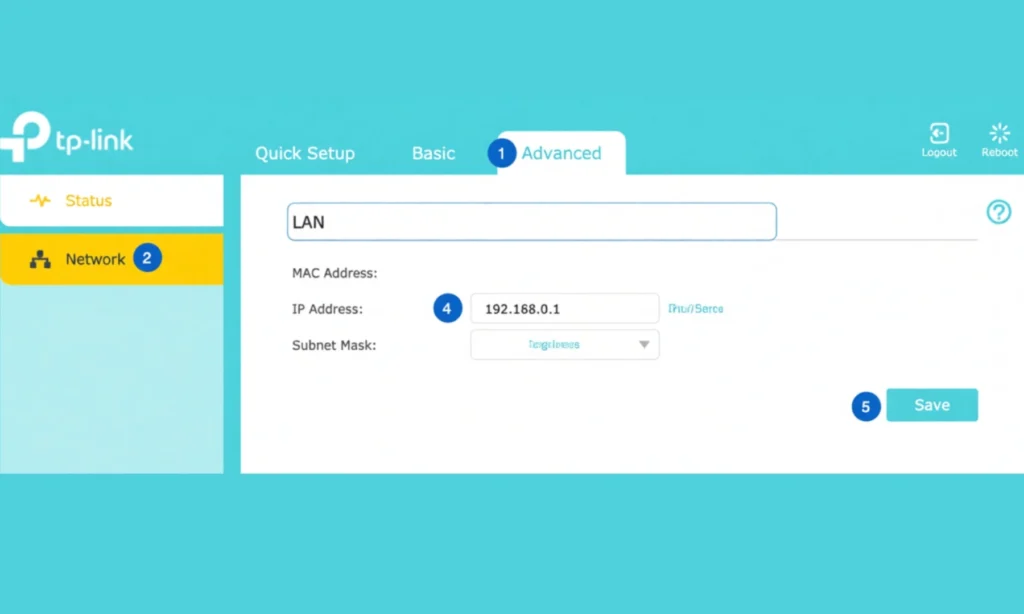
TP-Link Routers
Access the Interface: Open your web browser and navigate to http://192.168.1.1 or http://tplinkwifi.net.
Authenticate: Enter your administrator username and password. (If you haven’t changed these yet, the default credentials are usually printed on a sticker on the bottom of the device).
Navigate to LAN Settings: In the sidebar menu, click on Network, then select LAN.
Modify the IP: Locate the IP Address field. Delete
192.168.1.1and type in your preferred new address (e.g.,192.168.2.1).
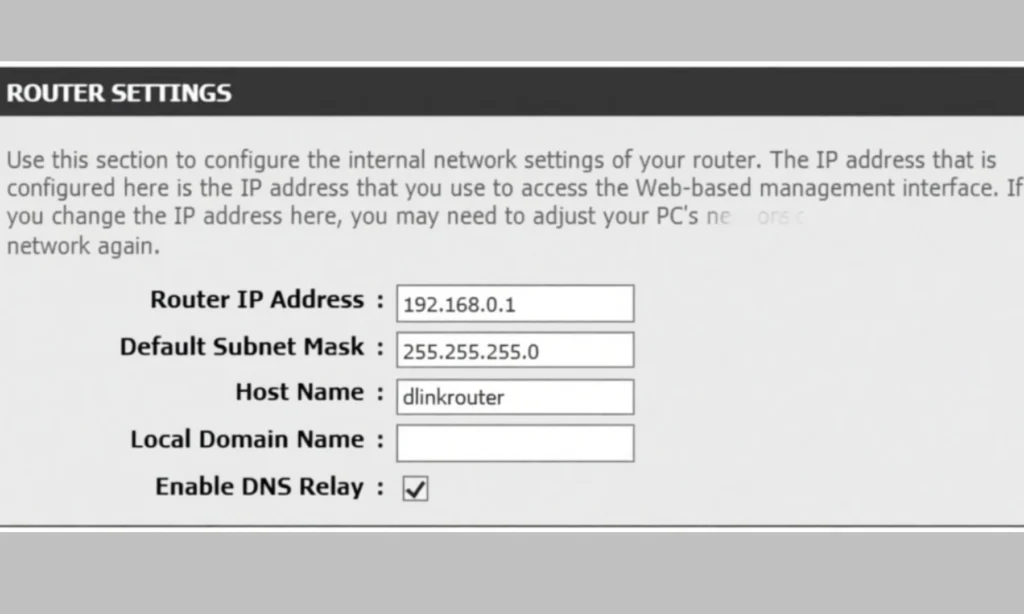
D-Link Routers
Connect and Open Browser: Ensure your device is connected to the router via Wi-Fi or Ethernet.
Access the Gateway: Type http://192.168.1.1 into your browser’s address bar and press Enter.
Log In: Enter your administrator username and password.
Navigate to Network Settings: Click on the Setup tab at the top, then select Network Settings from the left-hand menu.
Modify the Router IP: Locate the Router Settings or LAN section. Find the Router IP Address field and enter the new address you wish to use (e.g.,
192.168.0.1or10.0.0.1).
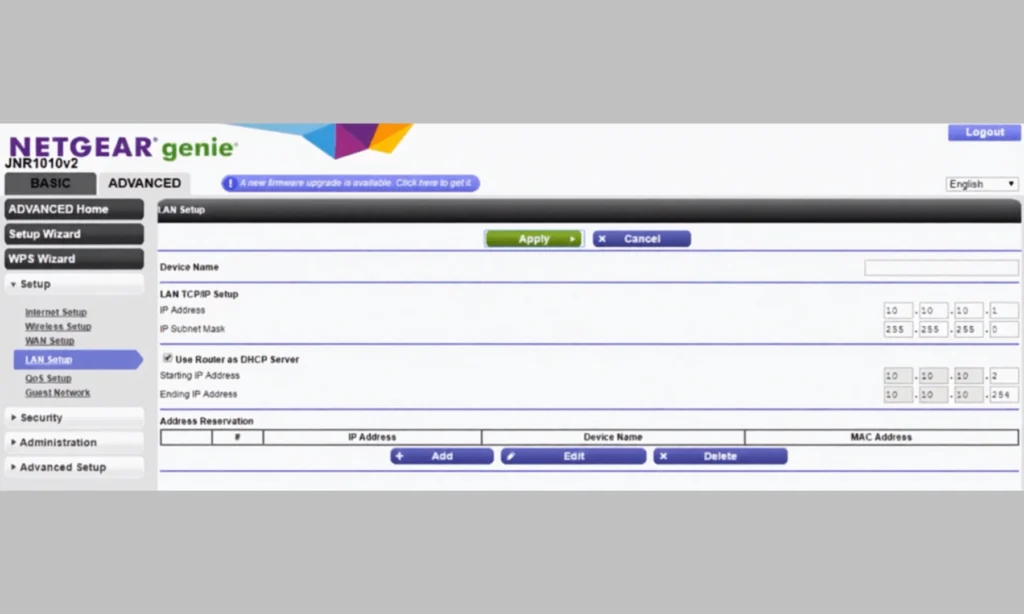
NETGEAR Routers
Access the Interface: Open your web browser and navigate to http://routerlogin.net (or the default http://192.168.1.1).
Authenticate: Enter your admin username and password.
Note: If you haven’t changed these, the default username is usually admin and the password is password.
Navigate to Advanced Settings: Click on the Advanced tab at the top of the page.
Open LAN Setup: From the left-hand sidebar, select Setup, then click on LAN Setup.
Modify the IP: In the LAN TCP/IP Setup section, locate the IP Address field. Type in your new desired IP address.
Important Notes
Document the New Address: Write it down immediately. 192.168.1.1 will no longer load your settings.
Use Private Ranges: To avoid internet connectivity issues, only use addresses within these standard blocks:
192.168.0.0–192.168.255.25510.0.0.0–10.255.255.255172.16.0.0–172.31.255.255
The Fail-Safe: If you lose access or type an invalid address, hold the physical Reset button on the back of the router for 15 seconds. This reverts the IP to the factory default.
Device “Hiccups”: After changing the IP, your devices might lose connection. Toggle your Wi-Fi off and back on to force them to recognize the new gateway.
The Ultimate Router Setup: Optimizing for Speed and Security
Once you’ve logged in to 192.168.1.1, fine-tuning your settings is the best way to boost your connection speed, ensure consistent stability, and lock down your network against hackers.
1. Hardening Your Wi-Fi Security
Default passwords are often public knowledge. To protect your data, navigate to the Wireless Security section. Action: Switch your security protocol to WPA3 (or WPA2-AES if WPA3 isn't available). Action: Create a unique SSID (Network Name) and a complex password that doesn't include personal information.
2. Optimizing Frequency and Channels
Most modern routers are "Dual-Band," offering both 2.4 GHz and 5 GHz frequencies. 2.4 GHz: Use this for devices far from the router; it travels better through walls. 5 GHz: Use this for gaming or streaming nearby; it offers much higher speeds. Pro Tip: Set your 2.4 GHz channel to 1, 6, or 11 to reduce interference from neighboring networks.
3. Updating Admin Credentials
The password to join your Wi-Fi is different from the password to manage your router. Action: Go to System Tools or Administration and change the default "admin" login. This ensures that even if someone gets on your Wi-Fi, they can't change your router's core settings.
4. Prioritizing Traffic with QoS
If your video calls lag when someone else starts a download, enable Quality of Service (QoS). Function: This setting allows you to tell the router which devices or activities (like Work-from-Home apps or Gaming) should get the "fast lane" during busy times.
5. Installing Firmware Patches
Manufacturers frequently release software updates to fix bugs and block new security threats. Action: Check the Firmware Update section. Keeping this current is the simplest way to prevent your router from becoming sluggish or vulnerable.
PLDT Home Fibr Login Guide: Accessing 192.168.1.1 and More
PLDT routers, common in the Philippines, use specific gateway addresses and credentials that can vary significantly between Fiber, DSL, and Ultera models. Identifying the correct combination is the first step to managing your home network.
Common PLDT Gateway Addresses
If 192.168.1.1 does not load the login page, try these alternatives based on your specific modem type:
Standard Fiber/DSL:
192.168.1.1Alternative Fiber Web Admin:
192.168.1.1/fh(The “/fh” suffix is required for many newer white gloss modems).PLDT Ultera/Home Bro:
192.168.15.1Smart Bro / Pocket WiFi:
192.168.0.1or192.168.8.1
Step-by-Step: Accessing Your PLDT Home Fibr Dashboard
1. Connecting Your Device to the PLDT Router
This is the most critical first step. Think of your router’s login page like a local file on a hard drive; you can’t open it unless you are physically “plugged into” the system.
2. Navigating to the PLDT Admin URL
Launch any browser such as Chrome, Firefox, Safari, or Edge.
3: Inputting the Precise Gateway Address
Type one of the following into the address bar:
Press Enter. One of these should load your PLDT admin login page.
4. Entering Your Username and Password
Once the login page loads, you’ll be prompted for a username and password. Because PLDT uses several different hardware vendors (like Huawei, FiberHome, or ZTE), the credentials can vary.
Why Your PLDT Router Isn't Using 192.168.1.1
Because PLDT utilizes hardware from various manufacturers like Huawei, FiberHome, and ZTE, the entry point for your settings depends entirely on your specific model and its firmware version.
Here is a quick breakdown of why these addresses vary and which one you likely need:
Step-by-Step: Updating Your PLDT Wi-Fi SSID and Password
1. Access the Admin Page
Open your browser, enter your router’s IP (e.g., 192.168.1.1 or 192.168.1.1/fh), and log in with your credentials.
2. Locate Wireless Settings
Look for the Network tab in the main menu, then select WLAN or Wireless. Depending on your model, you may need to click on WLAN Basic Settings or SSID Settings.
3. Update the SSID (Wi-Fi Name)
Find the field labeled SSID Name or Wireless Network Name. Delete the default “PLDTHOMEFIBR…” name and type in your preferred network name.
4. Update the Password
Find the section for Security or WPA Pre-Shared Key.
Encryption: Ensure it is set to WPA2-PSK or WPA3.
Password: Enter your new, strong password.
5. Apply and Reconnect
Click Save or Apply.
Resetting 192.168.1.1: Restoring PLDT Default Settings
Here is exactly how to perform it and what to expect.
1. Locate the Reset Button
Look for a tiny hole on the back or side of the modem labeled RESET. It is recessed to prevent accidental presses, so you will need a paperclip, safety pin, or SIM ejector tool.
2. The Reset Process
Keep the Power On: The router must be plugged in and turned on during this process.
Press and Hold: Insert your tool into the pinhole until you feel a click. Hold it down for 10 to 15 seconds.
Watch the Lights: Usually, the router lights will all flash at once or turn off and then back on. Once the lights begin to cycle, release the button.
Wait: Give the router 2 to 3 minutes to fully reboot.
3. What Changes (The Aftermath)
When the router comes back online, it will be exactly as it was the day it came out of the box:
Wi-Fi Reset: Your custom Wi-Fi name and password are gone. You must now look at the sticker on the router for the original “WLAN Key” or “Default Password.”
Admin Login: Any custom admin password you set is gone. Use the default username/password from the sticker.
Settings Wiped: If you had custom port forwarding, static IPs, or a Guest Network, you will need to set those up again.
4. Logging In Again
Once the “Power” and “WLAN” lights are stable:
Connect to the default Wi-Fi name printed on the sticker.
Open your browser and go to your gateway IP (e.g.,
192.168.1.1).Log in using the default credentials from that same sticker.
Troubleshooting 192.168.1.1: Common Login Failures and Fixes
It’s frustrating when you’re locked out of your own hardware, but usually, the fix is a simple adjustment to how your device is “talking” to the router.
If 192.168.1.1 is giving you a “Timed Out” or “Unable to Connect” error, check these common culprits:
1. Typing Errors
Ensure that you type the IP address accurately. Steer clear of frequent errors like using the letter “l” instead of the number “1” (192.168.l.l), adding an extra digit (192.168.1.1.1), or including “www” or “.com.”
2. Not Connected to the Router
To access the settings, you must be actively connected to your router via Wi-Fi or a physical Ethernet cable. The login page will fail to load if you are using mobile data, a neighbor’s Wi-Fi, or a personal hotspot.
3. Browser Cache Problems
Stored cache data can sometimes prevent the login page from appearing properly. To fix this, try clearing your browser’s cache, or simply open the IP address using Incognito Mode or a completely different web browser.
4. VPN or Proxy Blocking Local IP
Active VPNs or proxies can interfere with your connection by rerouting traffic, which prevents your browser from reaching local network addresses. To resolve this, disable your VPN and turn off any proxy settings before attempting to log in again.
Hardening Your Network: Advanced Security Tips for Your Wi-Fi
Locking down your Wi-Fi network is vital for blocking unauthorized users, safeguarding your private information, and ensuring your internet speeds remain consistently fast. To keep your connection secure, every user should implement these highly effective security measures.
Used a Strong Password
To maximize your security, construct a password using a combination of uppercase and lowercase letters, numbers, and special symbols. It is important to steer clear of easily guessable information like dictionary words, birthdays, or repetitive patterns.
Disable WPS
While WPS (Wi-Fi Protected Setup) is designed for convenience, it can inadvertently make it easier for attackers to gain access to your network. To reduce vulnerabilities, you should turn this feature off within your wireless security settings.
Update Firmware Regularly
To maintain a stable and secure connection, it is important to keep your router’s software current. Routers receive firmware updates specifically designed to fix bugs, patch vulnerabilities, and improve overall performance.
Hide SSID or Keep It Visible
The Trade-offs of a Hidden SSID
Pros of hiding: Your network becomes less visible to casual users or neighbors scanning for available Wi-Fi.
Cons of hiding: Advanced attackers can still detect hidden networks using specialized tools, and your own devices may experience less reliable reconnections or increased battery drain while searching for the “invisible” signal.
Use MAC Address Filtering
Enable a Guest Network
MAC filtering allows you to specify a list of approved devices that are permitted to connect to your network. While this feature provides strict control over who can access your Wi-Fi, it is important to remember that it can be inconvenient, as you will need to manually add the unique MAC address of every new device before it can get online.
A guest network provides a secure way to keep visitors’ traffic completely separate from your main devices. By setting one up, you ensure that guests can access the internet without having visibility into your private files, printers, or smart home hardware.
Block Unknown Devices
To maintain total control over your home network, you should regularly monitor the list of connected devices in your router settings. If you spot an unfamiliar smartphone, laptop, or “unknown” entry, you can immediately remove or block it to prevent further access.
Keep Your Router in a Central Location
The physical placement of your router is the single most important factor for consistent Wi-Fi speeds. A central, open spot ensures that the signal radiates evenly throughout your home, minimizing “dead zones.”
Frequently Asked Questions
What is 192.168.1.1 used for?
It is the Default Gateway (login address) for your router. It allows you to access the web-based settings to manage your WiFi name, password, and network security.
How do I log in to 192.168.1.1?
Connect to your WiFi, open a web browser, and type 192.168.1.1 into the address bar. Enter the Admin Username and Password found on the sticker at the back of your router.
What if the IP does not load?
Ensure you are connected to the correct WiFi and have disabled any VPNs. If it still fails, try using a different browser or clearing your browser cache.
How do I find my router's IP address?
On Windows, type ipconfig in the Command Prompt and look for “Default Gateway.” On Mobile, go to your WiFi settings and tap on your network to see the “Router” or “Gateway” IP.
What are the best router settings for speed?
Use the 5GHz band for faster speeds, set your Channel Width to 80MHz, and place the router in a central, elevated position away from thick walls.
How do I change my WiFi password?
Log in to the router page, go to the Wireless/WLAN section, select Security Settings, enter your new password in the “Passphrase” field, and click Save.
How do I reset my router?
Locate the small Reset pinhole on the back. Use a paperclip to press and hold it for 10–15 seconds until the lights flash. This restores all factory default settings.
How do I access my router on a phone?
Connect your phone to the WiFi, open Chrome or Safari, and enter the router’s IP address. The mobile interface works exactly like the desktop version.
What is 192.168.l.l?
This is a common typo. Users often mistake the number “1” for the lowercase letter “l”. The correct, numeric-only address is 192.168.1.1.
What if my router uses 192.168.0.1 instead?
Some routers use different default gateways. Type http://192.168.0.1 in your browser and log in the same way.